In this post...
Last updated on 19 October 2022
Define Your Price Bands

Before logging into your website and entering your pricing into your website’s Booking System it is a good idea to grab a pen and piece of paper and have a clear understanding of all your different price bands.
A single price band can apply to multiple ranges of dates. Maybe an off peak week in February and additionally maybe the full month of November? The date ranges don’t need to be consecutive.
The important thing is all dates in a single price band must all share the same Pricing structure (same weekly/nightly/short break prices) and the same Booking Rules (minimum stays / specified check in/out days).
Naming Your Seasons
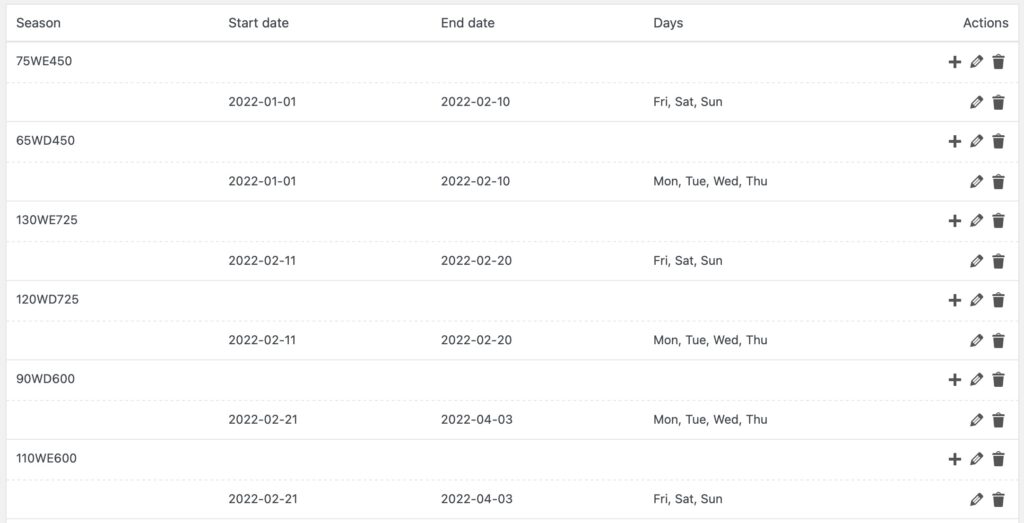
Your website’s booking system refers to your Price Bands as Seasons. To add or amend an existing Season go to OWcal > Seasons
When you add a Season its good practice to give it a name that will make sense to you later when you apply pricing and other rules to it.
“Low Season” for example is quite a vague name if you have plenty of price bands in the low season.
“OP 400PW” is a good name for an Off Peak price with a £400 weekly rate. Even then, it might not be clear enough if you offer a £400 weekly rate and £130 pn weekend rate for dates in April, and a £400 weekly rate and £150pn weekend rate for dates in May. You’d need 2 different seasons in this case, maybe name them “400PW130PN” and “400PW150PN”?
Whatever you decide to call it, after you’ve named your Season, you need to add underneath it the dates that you would like to apply to it.
Adding Dates To Your Seasons
Notice, after creating your Season you can tick the days of the week that apply to the Season. By default these are all ticked, meaning the rates and rules that you will later apply for this Season, will apply to every day of the week. This will work fine for you if your pricing consists only of weekly rates.
However, if your pricing is a little more complex and based more around nightly rates where a Saturday is more expensive than a Tuesday for example, you most likely will need to untick some of these days.
For example, if you create one Season for the period 1 – 31 January – let’s call it ‘JanWeekdays’ and tick the Mon-Thurs days. Then you create another season for the same period 1-31 January called ‘JanWeekends’ ticking the Fri-Sun days. This will allow us later to apply a different nightly rate for weekdays and weekends. Setting up your seasons this way will also allow us to apply a minimum 3 night stay for JanWeekends and a minimum 4 night stay for JanWeekdays.
At this stage we’ve just created Price Bands (Seasons) without actually applying any rates. However, you have just completed the most complicated and time consuming part of setting up your pricing. You still need to apply your rates though so now go to Step 2 – OWcal > Rates
Don’t Duplicate Your Dates across Multiple Seasons
If you use the same dates in multiple seasons your booking system will not know which Season these dates should belong to and may not apply the correct pricing.
An exception to this rule is in the example above where we created two seasons with the same dates but had different days of the week in each season.
What Makes Owners Websites So Different?
We at Owners Websites are Holiday Home Owners as well as Website Designers.
Our services have been developed to suit Holiday Home Owners – and not just customers looking for Website Design. We provide all the features you need (or may need in the future) to successfully manage your holiday home’s website and to deliver bookings to your website.